Caulking- It can be the Weakest Link
Make Sure Your Roof is Ready for Camping Season!
At RV Roofing Solutions, we love connecting with fellow RV enthusiasts at rallies, and to make your experience even better, we offer a FREE roof inspection for all attendees! While space is limited at rallies, you'll receive a detailed inspection report complete with photos showcasing your roof's condition, including detailed photos of the sealant. Whether you choose us, or not, we offer this service when we are at the same event- as long as the venue allows us to do so.
Many folks initially say, "I don't need a roof" or "My roof is in good shape," but the images in this post tell a different story—they're from RVs whose owners chose not to proceed with our system. Remember, before sealing any roof, a thorough inspection is vital. Addressing leaks and underlying issues first can prevent costly long-term damage, ensuring your adventures stay leak-free.
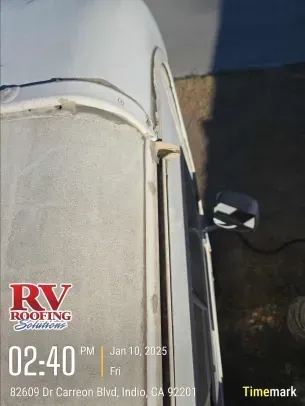
Begin by inspecting the entire surface, paying close attention to areas around vents, skylights, and other penetration points. Look for any gaps, separations, or signs of aging or weathering. This thorough inspection will help you determine the extent of the repairs needed and guide your decision on which sealant to use.
wear & tear with visable leak threats
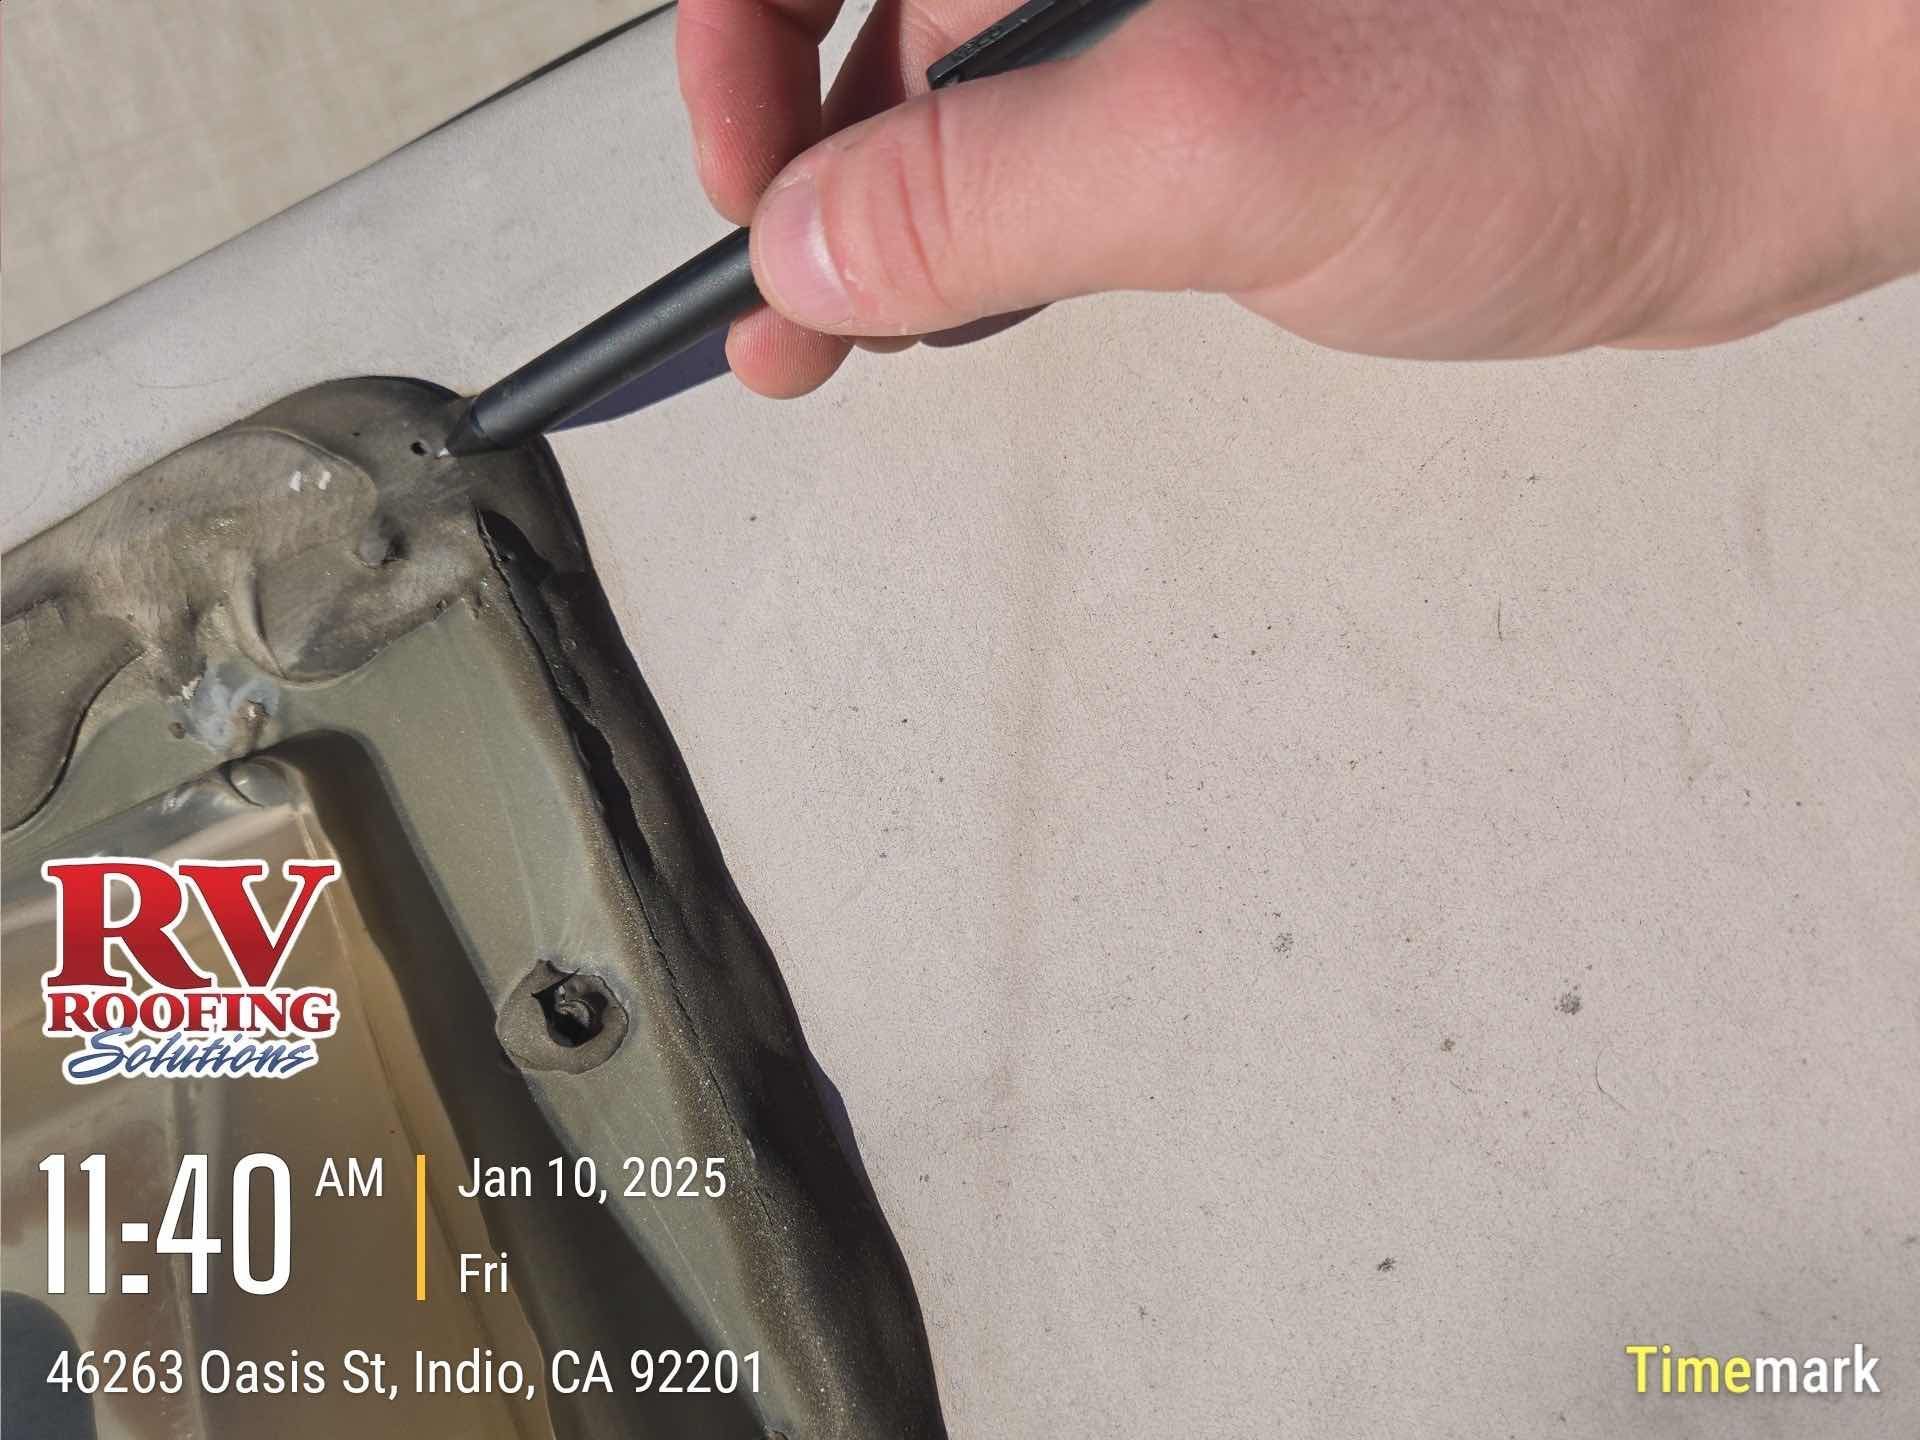
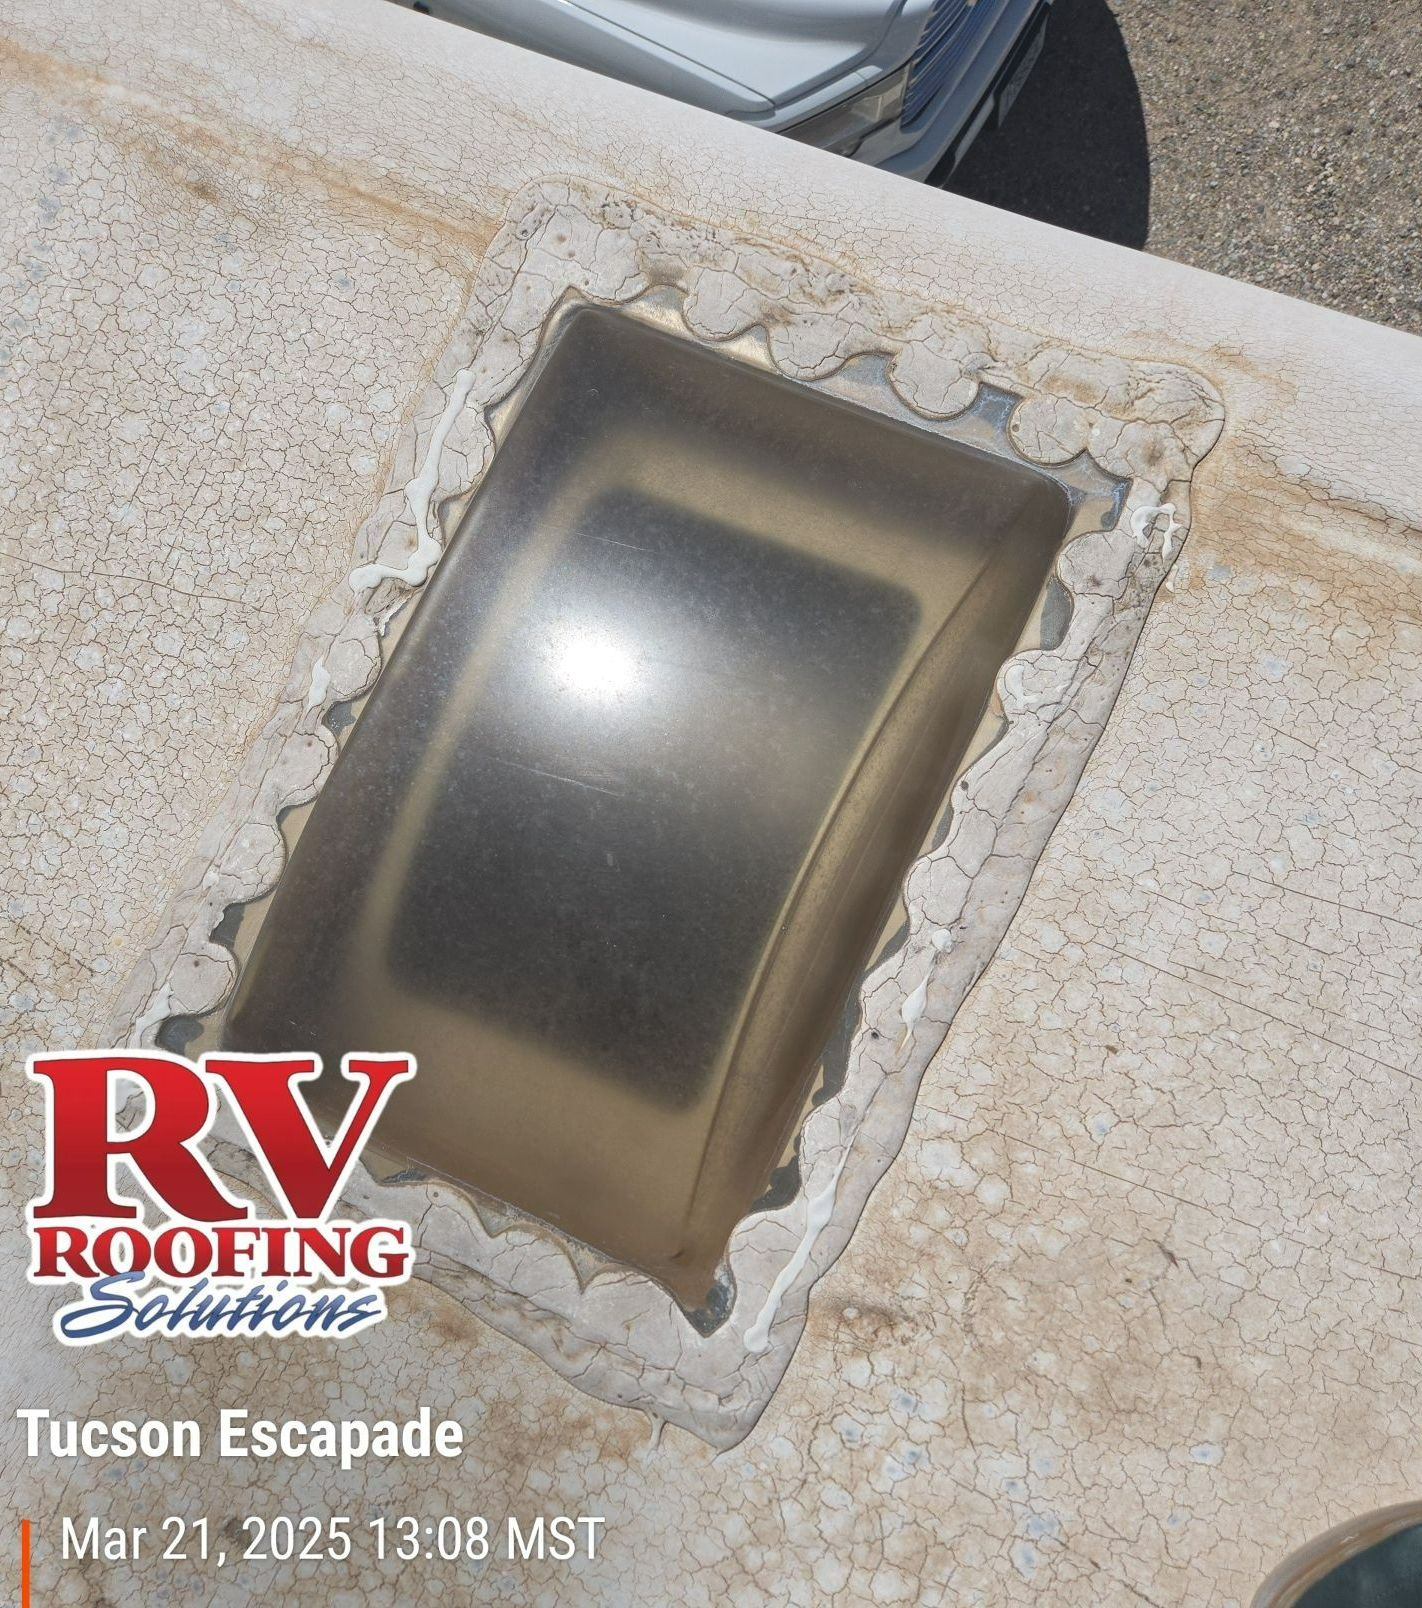
Pinholes
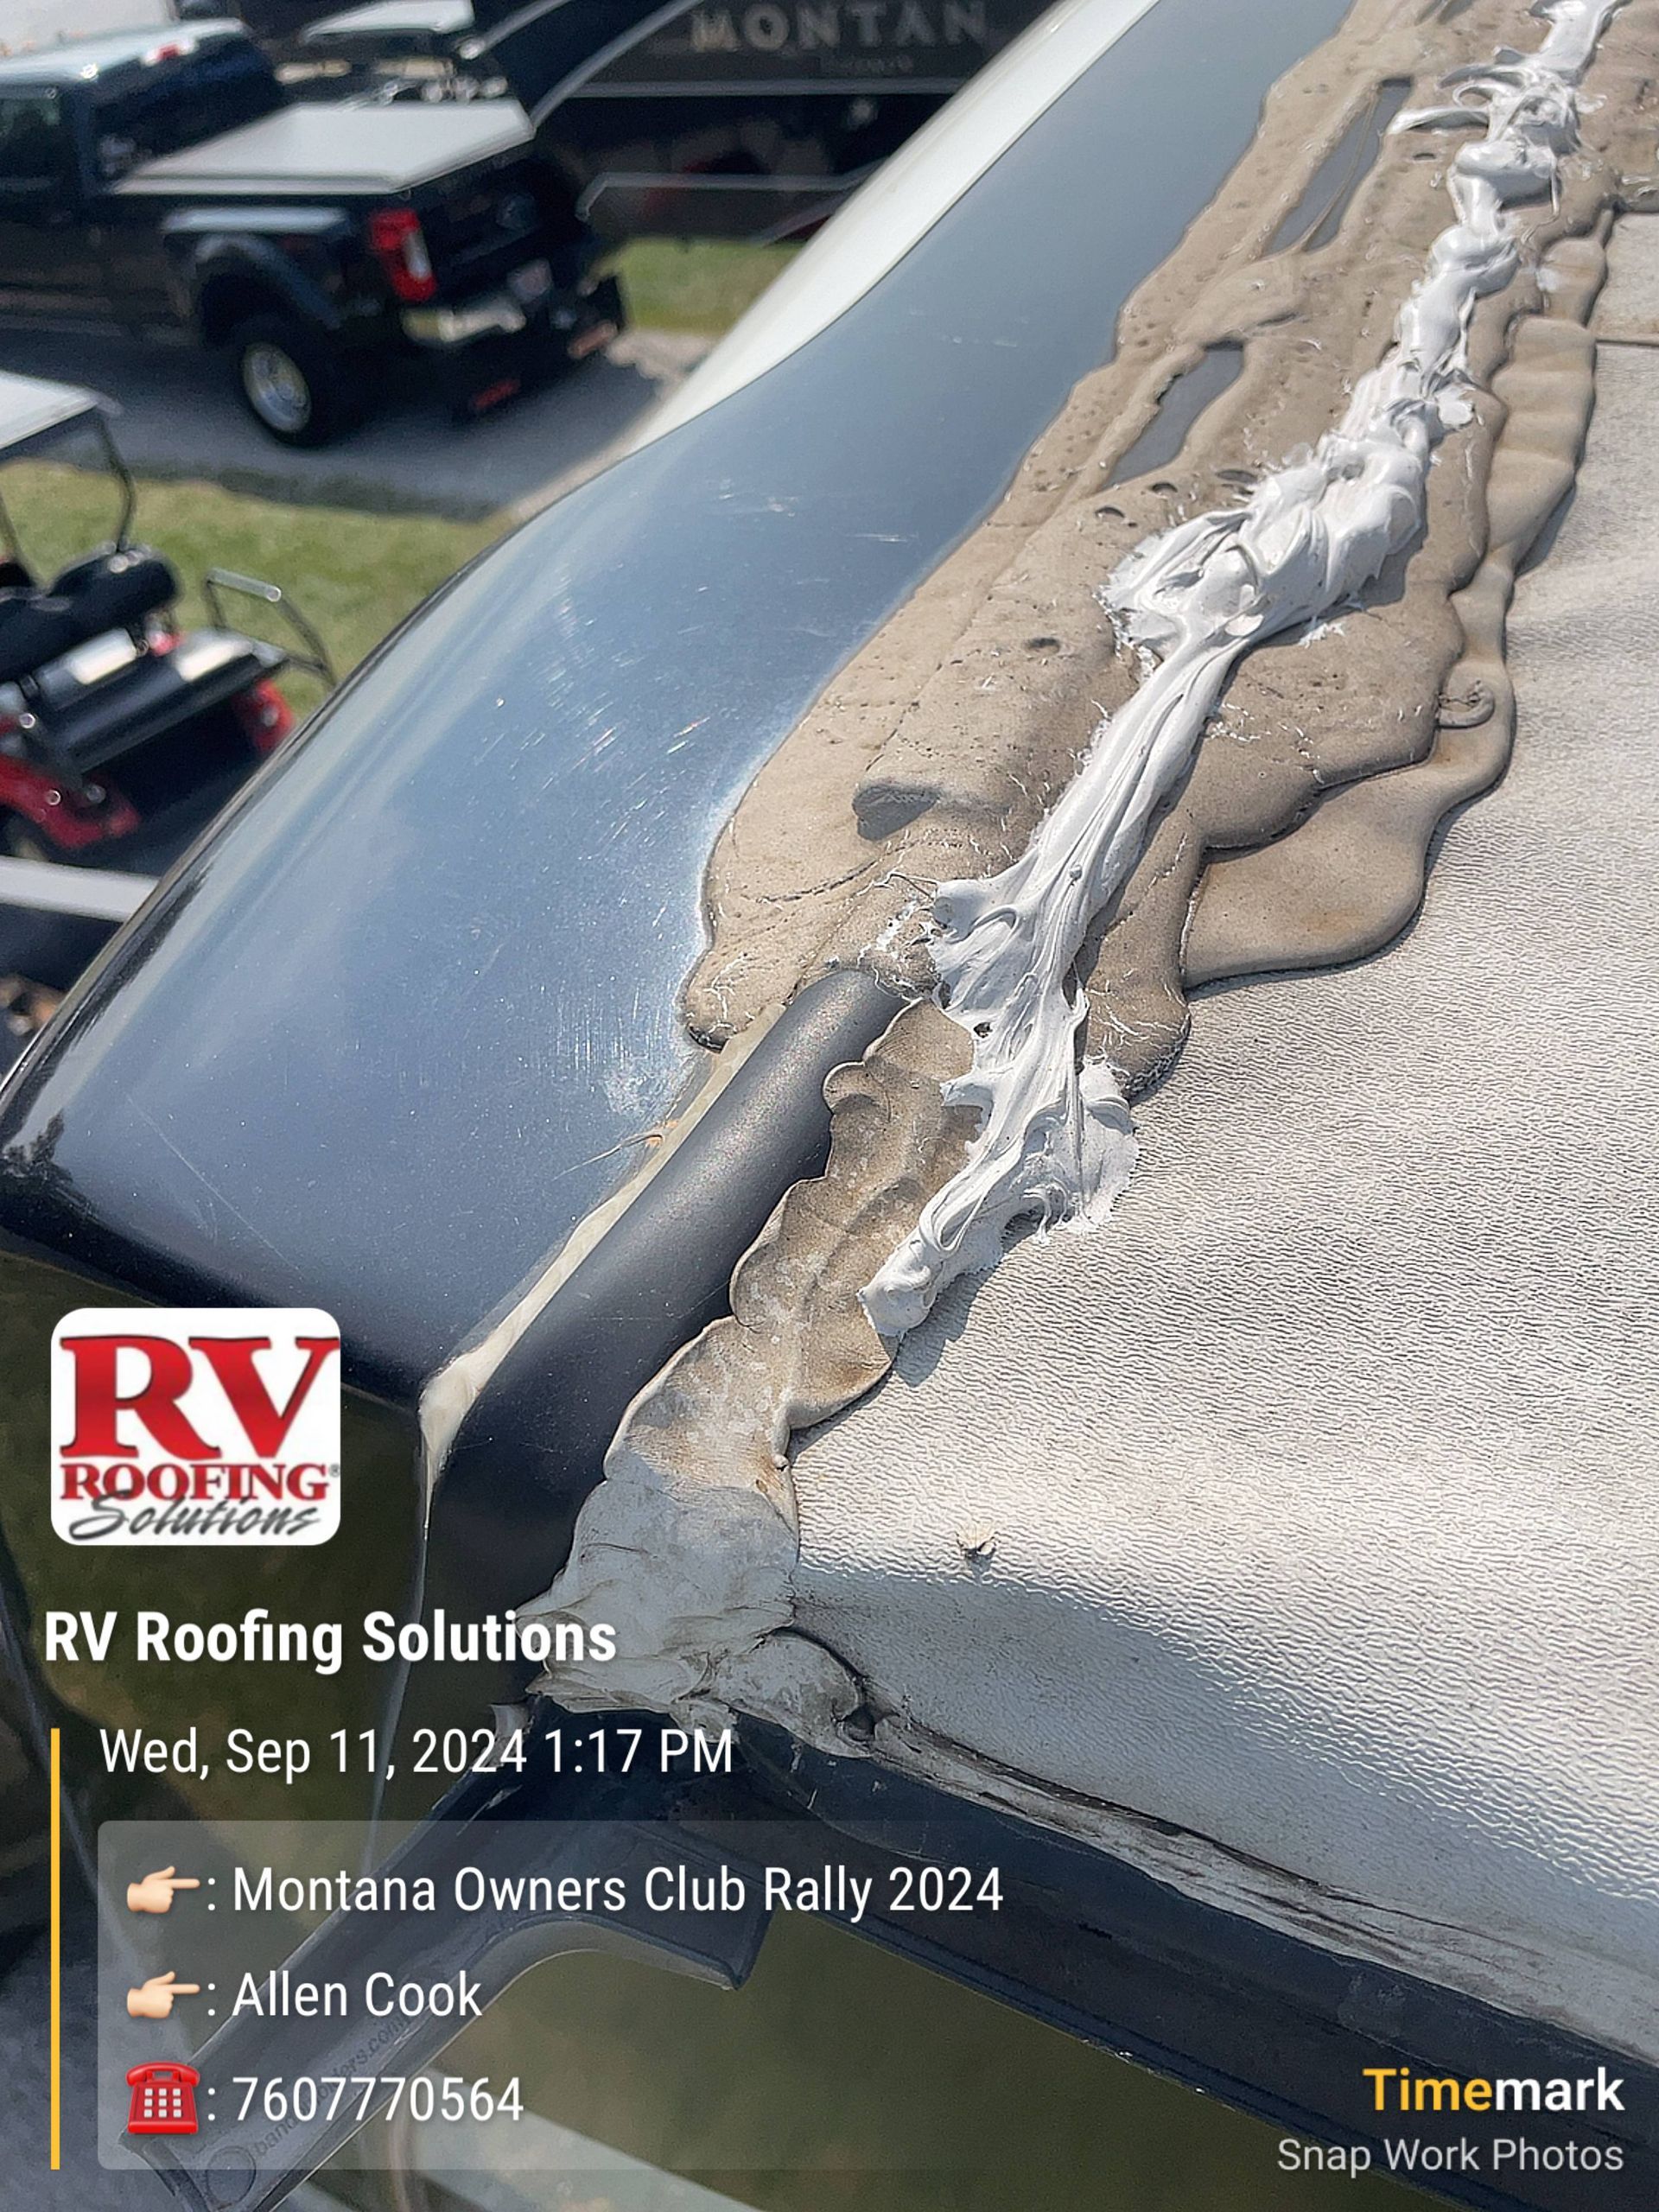
Layered caulking
Not enough sealant
At RV Roofing Solutions, we know that a clean roof is crucial for securing a reliable sealant bond. Any dirt, grime, or corrosion can compromise your RV's protection. Start by sweeping away larger debris, then wash & scrub the roof thoroughly with an industry trusted product like Aero Cosmetics Wash All Degreaser to tackle any stubborn residue. Be sure to rinse well and let the surface dry completely before applying the sealant. This methodical approach ensures a long-lasting adhesion that will keep your RV protected on the road!

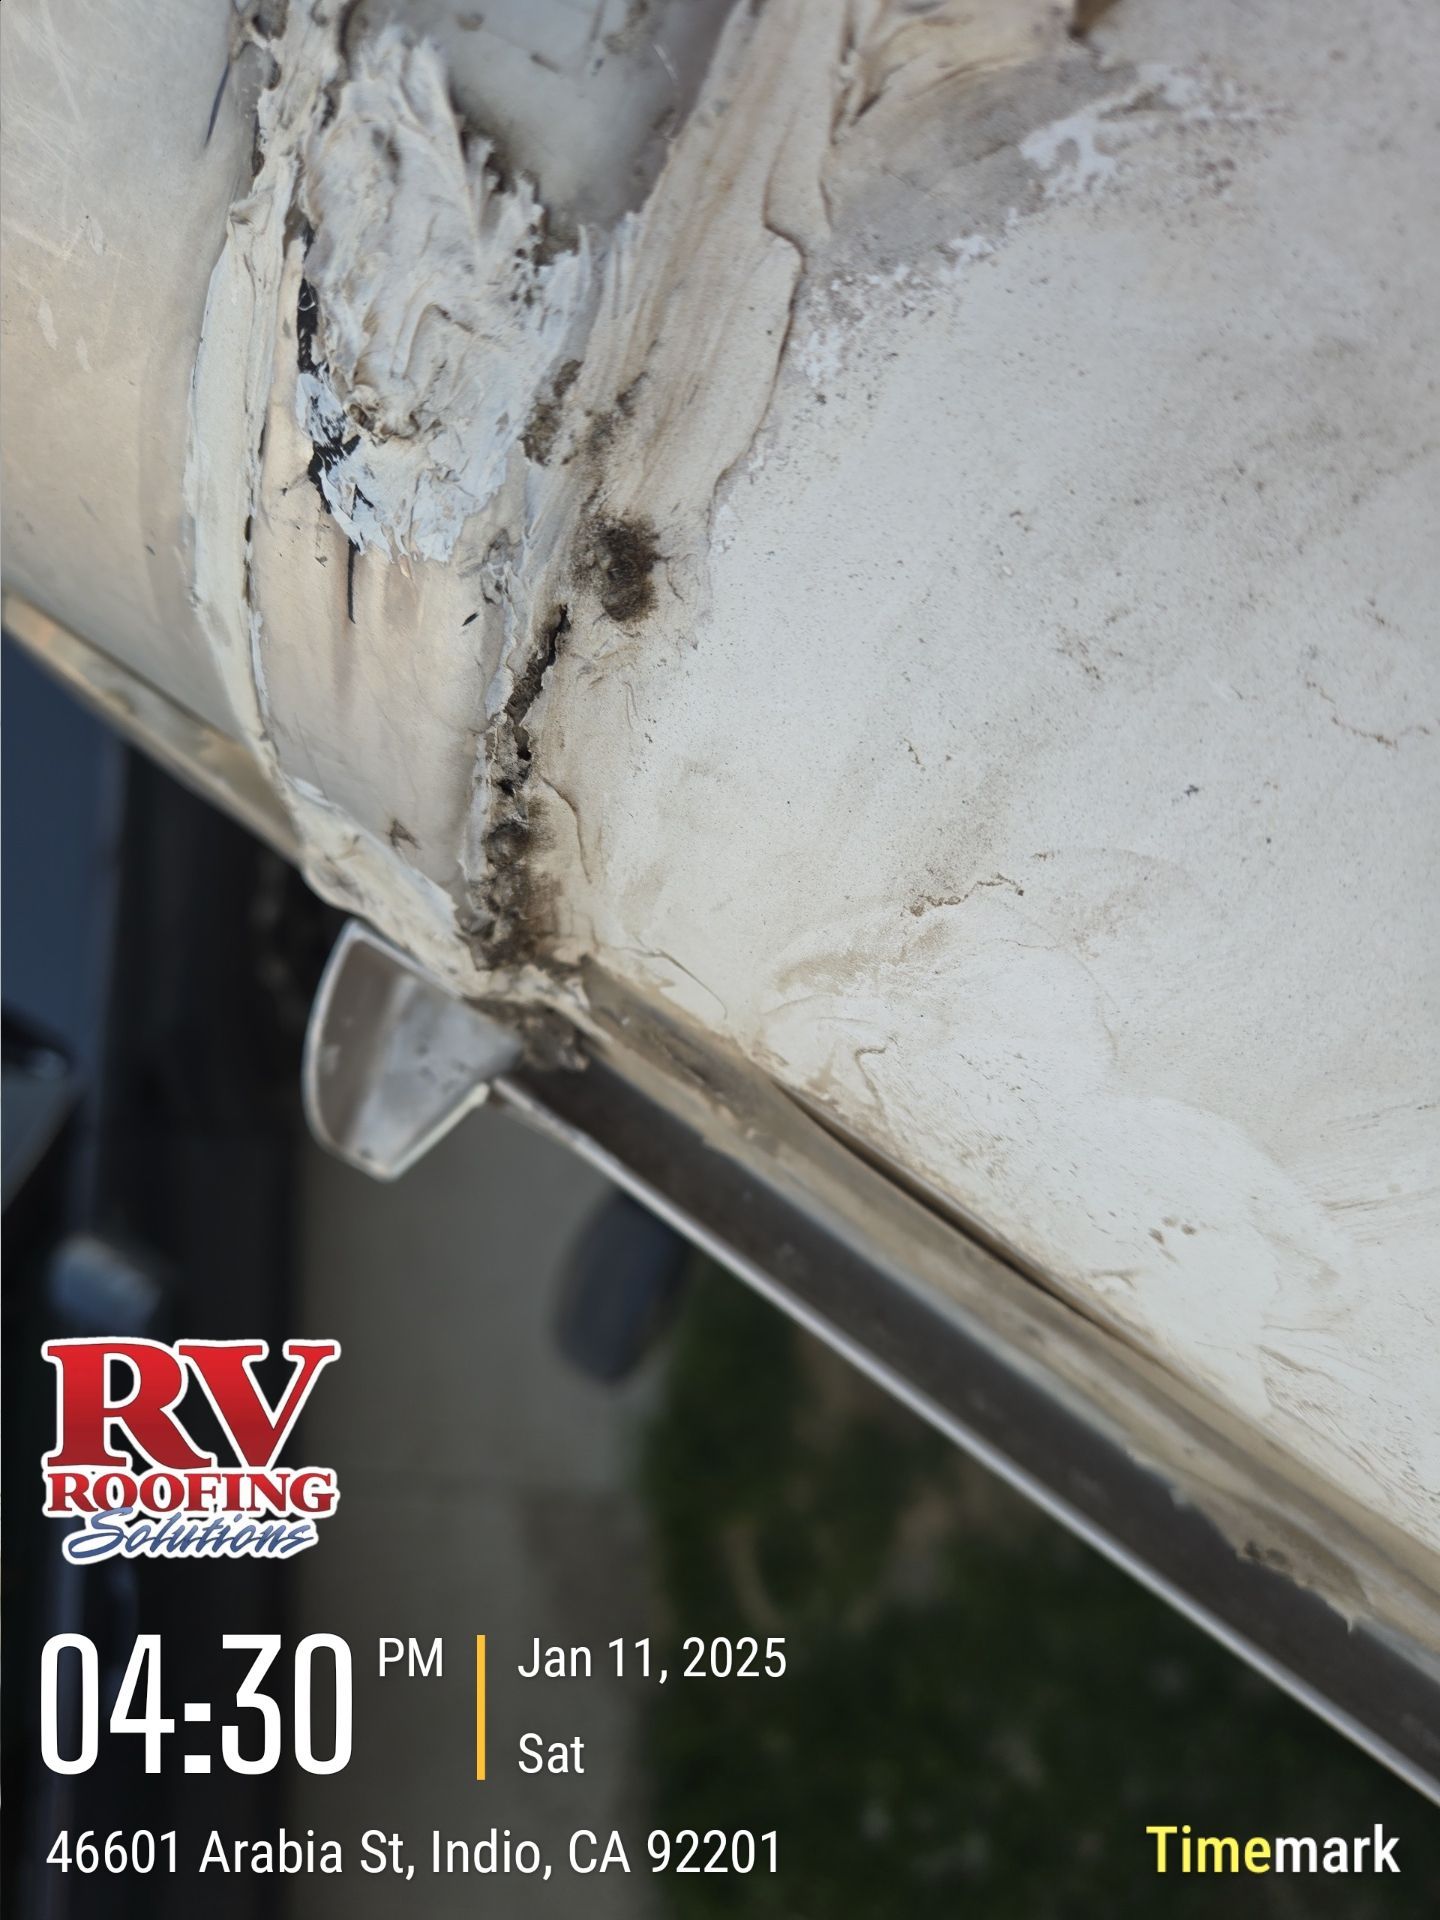
Uncovered open edges and holes
Leaves your roof open & exposed

Gaps in Caulking
Leaving a leak threat exposed with an unknown trail

Visable holes in caulk
These can cause catastrophic damage if left unchecked.

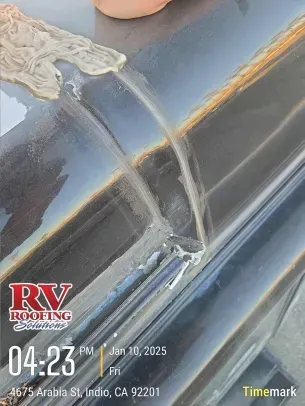
Layered caulk
This can cause weak points between layers making a leak difficult to find
When it comes to applying RV roof sealant, timing is everything! At RV Roofing Solutions, we recommend tackling this task on a warm, dry day. High humidity and rain can slow down the curing process and jeopardize the sealant's effectiveness. Plus, extreme temperatures can interfere with how well it sets. Always check the weather forecast and if conditions aren’t right, don’t rush it—wait for that perfect day. Protecting your roof is key to prolonging its life!
*Reliable RV caulks are essential for effective roof and gutter maintenance, ensuring leak-free adventures during travel.
*Self-leveling and non-leveling sealants serve different applications, with self-leveling ideal for horizontal surfaces.
*High adhesion strength and weather resistance are crucial for long-lasting performance in various environmental conditions.
*Eco-friendly and non-toxic formulations promote safety for both users and the environment while maintaining effective sealing properties.
*Understanding cure times helps in planning repairs, with some sealants curing within hours and others taking up to 30 days.
How to Choose the Best RV Caulk for Your RV?
When you’re selecting RV caulk, you’ll want to take into account several key factors. Think about how well it matches the materials in your RV and the ease of application. Don’t forget to evaluate its weather resistance, adhesion strength, and cure time to guarantee a reliable seal on your adventures.
Compatibility With Materials
Selecting the right RV sealants hinges on its compatibility with your RV’s roofing materials, such as EPDM, TPO, or PVC. To guarantee proper adhesion, you need to choose a caulk formulated specifically for these materials. Additionally, consider how well the caulk adheres to various substrates commonly found in RVs, like aluminum, fiberglass & wood. Each of these materials may require different formulations for effective bonding.
When you’re looking at caulks, opt for self-leveling caulks for horizontal surfaces. This feature helps create a smooth, even bead that effectively fills gaps and prevents leaks. It’s also essential to evaluate the product’s ability to withstand temperature fluctuations
and joint movement, especially since RV materials expand and contract with changing weather conditions.
Lastly, verify the caulk is designed for the intended environment. Look for waterproof and UV-stable formulas to maintain long lasting effectiveness against moisture and sun exposure over time. Take the time to evaluate the curing time and initial drying periods of the caulk. Products with faster curing times mean you can complete your project more quickly and get back to enjoying your RV adventures.
How often should I check my roof sealant?
If you don't get up on your roof you'll never know what's happening. You need to get up there to check the caulking sealant around your vents, seams and skylights about 4 times a year.
When your RV is manufactured, they use a general purpose caulking sealant that breaks down over time. It starts to crack and peel. You'll need to reapply caulking every 12-18 months as this is an item that breaks down and the more UV exposure the sooner this can be an issue.
Can I just caulk over the old caulk to patch things up?
People often ask, “Can you caulk over old caulk?” but it may be more important to ask, “Can you caulk over cracked caulk?”
Generally, caulking over old caulk isn’t recommended. Removing the old caulk and replacing it with a new caulk instead usually creates a better seal & is the best way to ensure leak prevention.
How often should I remove & replace my caulking?
If you don't have a maintenance free roofing system, you should remove & replace your old sealant every 12-18 months.
If you are a DIY'er this will include washing the roof, removing sealants, and recaulking the roof.
If you are paying an RV technician to do the work make sure they are using industry trusted products. A typical cost for this service, depending on your location can range in price from $1500.00-$2600.00 and should take about 8 hours.
This process will need to be repeated about every 12-18 months as long as you own the RV


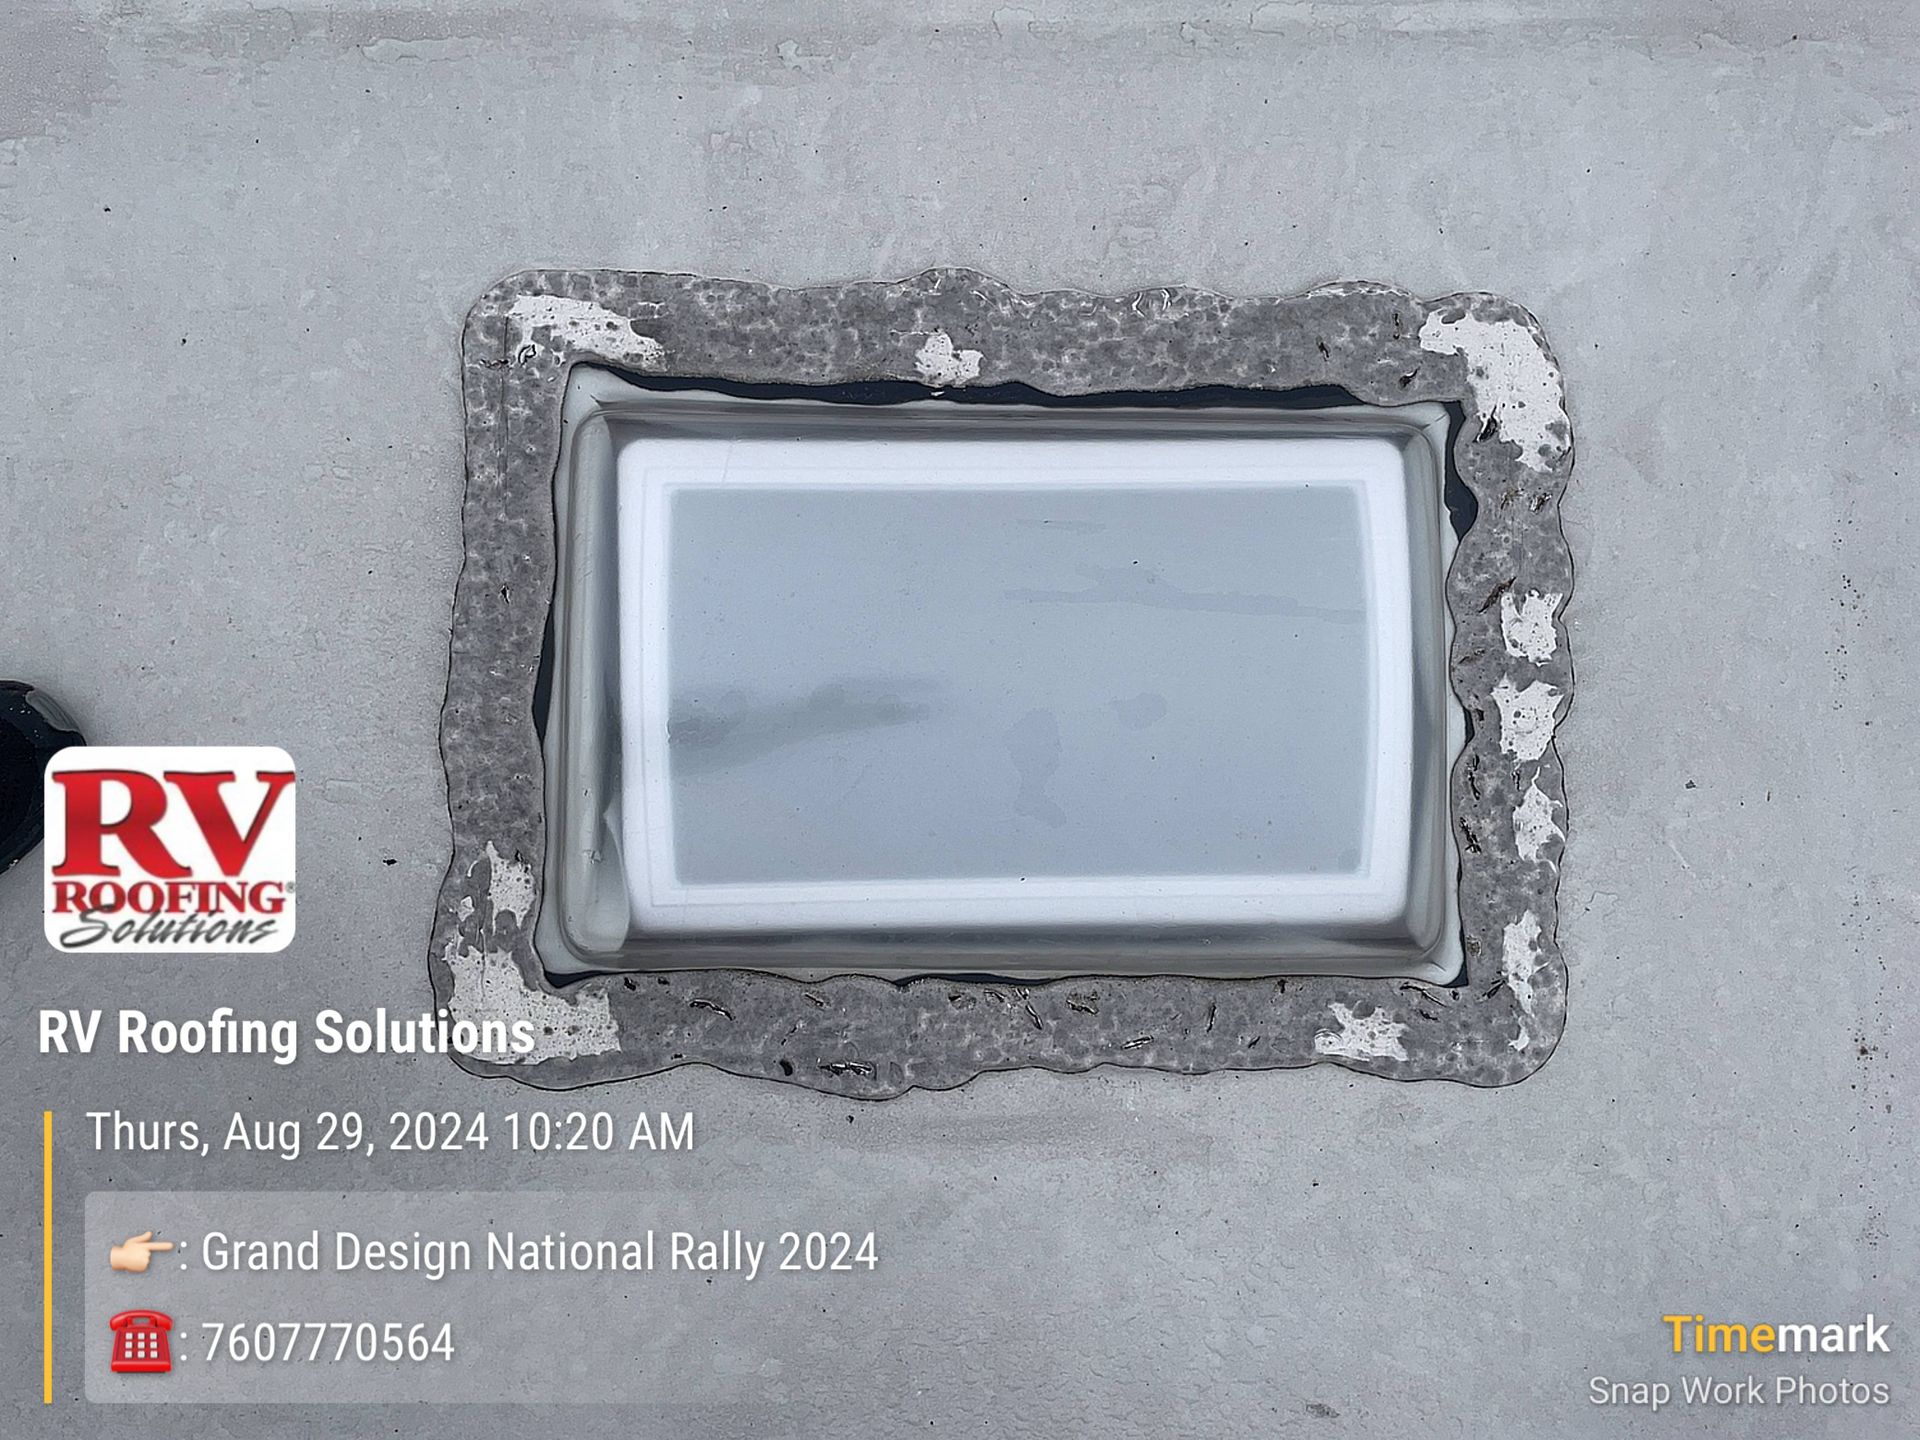
Exposed Screws
screws should also have sealant covering them to avoid any issues

Thick layers of caulk
while this may seem like a good idea, dirt & debris can get trapped between layers and create areas where water can get in
Lots of caulk
But not enough of it in all the right places
At RV Roofing Solutions, we understand that applying a sealant is just the beginning of protecting your RV’s roof.
Damaged, cracked, and worn caulk won’t provide a firm surface for the top layer of caulk, often leading to cracks and damage in new caulk. Remove the old layer before properly sealing the gap. Similarly, dirty or moldy caulk doesn’t just go away because you cover it with new caulk.
One of the easiest ways to remove your RV’s old caulking is by using a putty knife, multitool and heat gun. You will also need a caulking gun & rag to re-caulk all the seams and seals. After allowing the heat to soften the caulk, you can start scraping it off. To do so, take your plastic putty knife and be sure to have a firm grip on it. While holding it firmly, scrape off the softened caulk. Be careful not to scratch or tear the RV roof surface during this process.
After you have removed the softened caulk, it’s time to surface clean. You can do so by using a rag. Brush away any dirt and debris and then wipe the area with denatured alcohol and allow to dry completely before applying the fresh caulking.
Once you’ve applied that fresh sealant, it’s crucial to let it dry and cure properly. Rushing this process or exposing it to the elements too early can lead to cracks and uneven curing, compromising its effectiveness. So, take a moment to breathe and let the sealant do its job without interference. Trust us; a little patience goes a long way in ensuring you have a robust, long-lasting shield against leaks and harmful UV rays. Your RV deserves the best—and that starts with proper care!
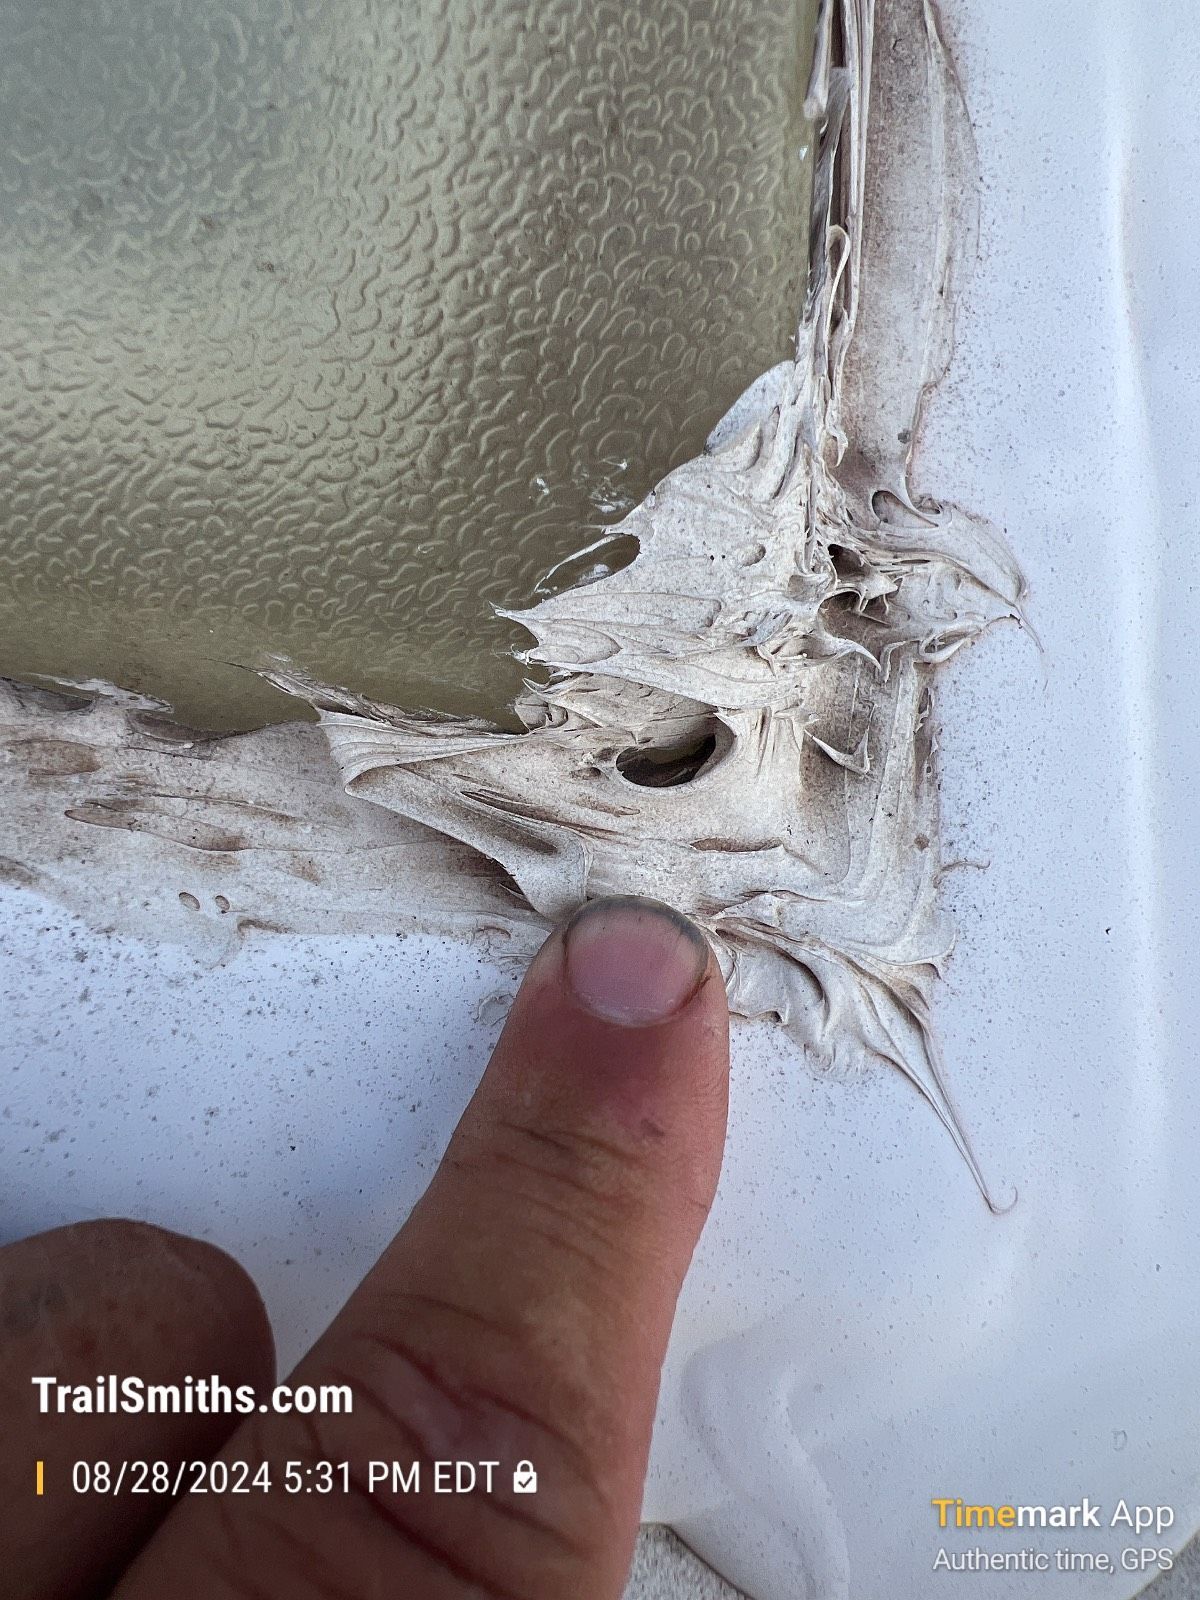
visable holes in caulk
This may or may not be sealed well but it does leave a spot for water to pool inside the caulk which is risky.
aged caulk
as caulk ages it breaks down and leaves the RV roof vulnerable

Exposed edges and screws
A lot of time critical things like screws are often overlooked when sealing the seams

Uneven edges
cracks and gaps in sealant can create a leak that goes unnoticed
At RV Roofing Solutions, we understand that successful RV roof maintenance starts with following the right tools and instructions—those crafted by the very experts who designed the product you choose to use. That said, if you are taking on the task as a DIY please consult the manufacturer of the product you choose if you run into any issues during the process.
Evaluating the long term durability of RV caulk is fundamental for guaranteeing your adventures remain leak-free. When selecting caulk, consider its resistance to UV degradation. High-quality products resist yellowing and maintain flexibilty over time, which is essential for a reliable seal. Additionally, look for caulks that can handle temperature fluctuations. They should expand and contract without cracking, preventing adhesion failure in extreme conditions.
Waterproofing capabilities are another significant factor. Opt for caulks that promise long-lasting protection against heavy rain in varying temperatures. You want a seal that remains intact, safeguarding your RV from leaks.
Please note that some roofs are beyond "just" caulking to fix. If you have a failed EPDM roof that is sticky to the touch or your roof has underlying soft or spongy areas in the decking these issues should be addressed and handled by professionals.
If you are tired of all the maintenance and you are looking for a better way, our high-quality aftermarket RV roofing systems are professionally installed, ensuring the best results. Our mobile installers are here to make the process seamless, coming directly to you and providing a maintenance free system that eliminates the need to caulk your RV year after year. Over 60% of our clients actually choose our system before they ever have a leak.
Our system protects your RV from the sun's harmful rays and helps to keep it cooler on hot days and warmer on cold ones.
* Durability: Built to last with high-quality materials and a tried and true process.
* Safety: Our products meet rigorous safety standards & is low VOC making it safe for you and your family.
*Nationwide: We come to YOU.
By trusting our proven methods, you can enjoy a maintenance-free RV roof that stands the test of time.
So, gear up for adventure, because when you follow our lead, success isn’t just a possibility; it comes with a 10-year warranty!
You might also like
RV Roofing Solutions' Blog